<?xml version="1.0" encoding="utf-8"?><feed xmlns="http://www.w3.org/2005/Atom" ><generator uri="https://jekyllrb.com/" version="3.10.0">Jekyll</generator><link href="https://chetter14.github.io/feed.xml" rel="self" type="application/atom+xml" /><link href="https://chetter14.github.io/" rel="alternate" type="text/html" /><updated>2026-07-31T13:48:05+00:00</updated><id>https://chetter14.github.io/feed.xml</id><title type="html">Artem Leshchukov Blog</title><subtitle>Software Engineer</subtitle><entry><title type="html">Order book. Part 2.</title><link href="https://chetter14.github.io/Order-book,-part-2/" rel="alternate" type="text/html" title="Order book. Part 2." /><published>2026-07-31T00:00:00+00:00</published><updated>2026-07-31T00:00:00+00:00</updated><id>https://chetter14.github.io/Order%20book,%20part%202</id><content type="html" xml:base="https://chetter14.github.io/Order-book,-part-2/"><![CDATA[<p>Now let’s get to the implementation details of the order book - the main module, where the matching logic resides. There are <em>five important functions</em> that require an explanation. I’ll start with the smallest ones.</p>

<p>1) <code class="language-plaintext highlighter-rouge">advanceAsksBoundary()</code>. When a sell order is executed (a suitable buyer appears), we want to <em>move the index of the lowest ask up if the lowest ask is completely fulfilled</em>. So we <em>increment</em> the asks start index <em>until an ask with a higher price is found, or until MAX_PRICE_VALUE is reached</em>.</p>

<p>2) <code class="language-plaintext highlighter-rouge">retreatBidsBoundary()</code>. The opposite of <code class="language-plaintext highlighter-rouge">advanceAsksBoundary()</code>. When a buy order is executed (a suitable seller appears), we want to <em>move the index of the highest bid down if the highest bid is completely fulfilled</em>. So we <em>decrement</em> the bids start index <em>until a bid with a lower price is found, or until MIN_PRICE_VALUE is reached</em>.</p>

<p>3) <code class="language-plaintext highlighter-rouge">executeBid(const Order&amp;, Price)</code>. We get here when the bid price is higher than or equal to the lowest ask price (the asks start index). <em>The bid is executed sequentially, starting from the asks start index. If, after executing the sell orders, the bid is still not fully executed, it is stored in the order book</em> for future orders. The bids start index is now at this price, and the asks start index is somewhere above it.</p>

<p>4) <code class="language-plaintext highlighter-rouge">executeAsk(const Order&amp;, Price)</code>. The opposite of <code class="language-plaintext highlighter-rouge">executeBid(...)</code>. We get here when the ask price is lower than or equal to the highest bid price (the bids start index). <em>The ask is executed sequentially, starting from the bids start index. If, after executing the buy orders, the ask is still not fully executed, it is stored in the order book</em> for future orders. The asks start index is now at this price, and the bids start index is somewhere below it.</p>

<p>5) <code class="language-plaintext highlighter-rouge">applyOrder(const InputOrder&amp;)</code>. Checks the order type, compares the input order price with the bids/asks start index and, depending on the case, handles the input order:</p>

<ul>
  <li>executes the order, or</li>
  <li>does not execute the order and just adds it to the order book (possibly updating the bids/asks start index as well)</li>
</ul>

<p>After implementing it, I wrote unit tests for the module. I won’t dive into the details, but basically I tried out every scenario I could think of: an exact buy (sell) order empties the level of sell (buy) orders; when the bids and asks start indices cross, everything is processed correctly (nothing is superfluous or missing); and so on.</p>

<p>Another cool thing I did was modifying CMake to handle <strong>sanitizers (ASan and TSan) and coverage</strong>. I used an <code class="language-plaintext highlighter-rouge">INTERFACE</code> target that I later link to the target modules (i.e., to the order book library):</p>
<div class="language-cmake highlighter-rouge"><div class="highlight"><pre class="highlight"><code><span class="c1"># Set of flags used by all the targets</span>
<span class="nb">add_library</span><span class="p">(</span>target_flags INTERFACE<span class="p">)</span>

...

<span class="nb">if</span> <span class="p">(</span>USE_ASAN AND USE_TSAN<span class="p">)</span>
    <span class="nb">message</span><span class="p">(</span>FATAL_ERROR <span class="s2">"Can't use ASAN and TSAN together!"</span><span class="p">)</span>
<span class="nb">endif</span><span class="p">()</span>

<span class="nb">if</span> <span class="p">(</span>NOT MSVC<span class="p">)</span>
    <span class="nb">if</span> <span class="p">(</span>USE_ASAN<span class="p">)</span>
        <span class="nb">target_compile_options</span><span class="p">(</span>target_flags INTERFACE -fsanitize=address,undefined -g<span class="p">)</span>
        <span class="nb">target_link_options</span><span class="p">(</span>target_flags INTERFACE -fsanitize=address,undefined<span class="p">)</span>
    <span class="nb">endif</span><span class="p">()</span>
    <span class="nb">if</span> <span class="p">(</span>USE_TSAN<span class="p">)</span>
        <span class="nb">target_compile_options</span><span class="p">(</span>target_flags INTERFACE -fsanitize=thread -g<span class="p">)</span>
        <span class="nb">target_link_options</span><span class="p">(</span>target_flags INTERFACE -fsanitize=thread<span class="p">)</span>
    <span class="nb">endif</span><span class="p">()</span>
    <span class="nb">if</span> <span class="p">(</span>USE_COVERAGE<span class="p">)</span>
        <span class="nb">target_compile_options</span><span class="p">(</span>target_flags INTERFACE --coverage -O0 -g<span class="p">)</span>
        <span class="nb">target_link_options</span><span class="p">(</span>target_flags INTERFACE --coverage<span class="p">)</span>
    <span class="nb">endif</span><span class="p">()</span>
<span class="nb">endif</span><span class="p">()</span>
</code></pre></div></div>

<p>Also, I added CMake <em>presets</em> for compiling the project with <em>g++ or clang++</em> (in debug/release mode, with sanitizers, with coverage).</p>

<p>I even wrote a <em>bash script for running code coverage</em>. It takes a bunch of steps, so I decided to automate it - if coverage is needed, you can just run the script.</p>

<div class="language-bash highlighter-rouge"><div class="highlight"><pre class="highlight"><code>./run_coverage.sh
</code></pre></div></div>]]></content><author><name></name></author><summary type="html"><![CDATA[Now let’s get to the implementation details of the order book - the main module, where the matching logic resides. There are five important functions that require an explanation. I’ll start with the smallest ones.]]></summary></entry><entry><title type="html">Order book. Part 1.</title><link href="https://chetter14.github.io/Order-book,-part-1/" rel="alternate" type="text/html" title="Order book. Part 1." /><published>2026-06-27T00:00:00+00:00</published><updated>2026-06-27T00:00:00+00:00</updated><id>https://chetter14.github.io/Order%20book,%20part%201</id><content type="html" xml:base="https://chetter14.github.io/Order-book,-part-1/"><![CDATA[<p>I had a desire to write a highload project in C++ with some application in high-frequency trading, finance, and related fields. My goal is not exactly to dive into the domain of a problem, but rather to carry out millions of operations per second and make a <em>solid</em> C++ project (with tests, scripts, and benchmarks).</p>

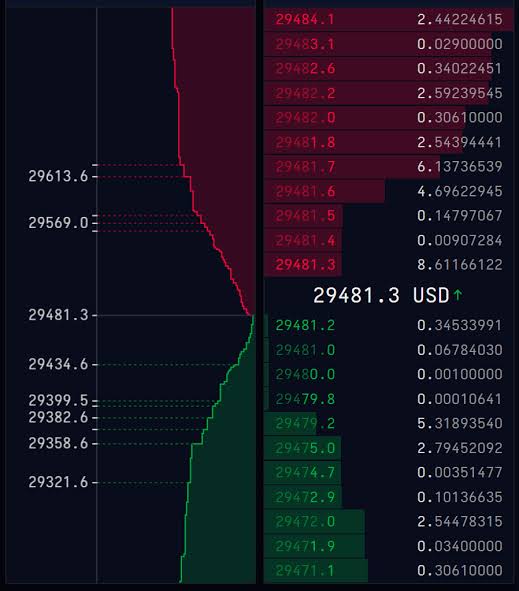
<p>I came to the idea of writing an <strong>order book</strong> - a structure that keeps track of all the buy and sell orders (<em>bids</em> and <em>asks</em>, respectively). It can be found on stock exchanges’ UIs. For example, buy orders on the left (marked green) and sell orders on the right (marked red).</p>

<p>An image of an order book I found on the Internet:
<img src="../images/order-book.jpg" alt="" /></p>

<p>I began thinking about the implementation part of the order book. The first assumption I’ve made is that <strong>prices are not floating-point numbers</strong>, they are just <strong>integers</strong>. This way I can avoid problems with math and special handling of numbers:</p>
<div class="language-plaintext highlighter-rouge"><div class="highlight"><pre class="highlight"><code>using Price = unsigned int;
</code></pre></div></div>

<p>How am I going to store bids and asks efficiently, so that it doesn’t consume much memory, doesn’t degrade performance, and still provides a solution to the problem? I came to the idea of using an array, where <strong>each index of this array is a price</strong>.</p>

<p>A couple of advantages of having an array here:</p>

<p>1) As I understand it, most operations are done at the intersection of buy and sell prices. In an array, these cells are going to be near each other. Such a placement in memory is <em>cache-friendly</em>.</p>

<p>2) <em>O(1)</em> access complexity.</p>

<p>Even though the array seems good here in a <em>performance</em> sense, what about memory? Will it be reallocated every time a new, higher price arrives? I thought it would be a problem, so I made a second assumption here - <strong>the price is going to be limited at the top by some value</strong>. I think it’s a huge oversimplification on my part, but again, I’m not trying to make a real-world-like order book that can be used in real projects, at least for now. Maybe in the future I’m going to implement this part “correctly”.</p>
<div class="language-plaintext highlighter-rouge"><div class="highlight"><pre class="highlight"><code>constexpr std::size_t MAX_PRICE_VALUE = 9999U, MIN_PRICE_VALUE = 1U;
</code></pre></div></div>

<p>So, the array is going to be <em>preallocated</em> and <em>stay the same size</em> during the whole execution of the program. But what does this array store exactly? How should I store the orders with the same price?</p>

<p>The only operations I’ll be doing with the orders at a specific price are <em>adding and removing</em>. And <em>the order of insertion and removal is important</em>, because if I have a bunch of bids and an ask comes in, then the oldest bid has to be processed first. Also, I don’t need to access a random order at a price; it’s just not required for the problem I’m trying to solve.</p>

<p>I think a logical solution for this is a <strong>queue of orders</strong>. If a new order arrives, then it’s either inserted at the end of the queue, or processed from the start (the oldest ones). I have doubts about such a choice though: the queue is <em>not cache-friendly</em> like an array, so I guess it can affect performance negatively.</p>
<div class="language-plaintext highlighter-rouge"><div class="highlight"><pre class="highlight"><code>  /**
  * @brief Array of prices that holds bids and asks.
  * 
  */
  std::array&lt;std::queue&lt;Order&gt;, MAX_PRICE_VALUE + 1&gt; prices;
</code></pre></div></div>

<p>It’s also a vital part to take care of executing orders if they match - when a bid and an ask have the same price. For such cases I added a <strong>bids start index</strong> and an <strong>asks start index</strong>. Basically, these variables are <em>the prices of the highest bid and the lowest ask</em>. I was thinking about using iterators instead of plain numbers, but in my case I need the exact price of the top-most bid and the bottom-most ask. Iterators just don’t fit well for handling the intersection of bid and ask prices.</p>
<div class="language-plaintext highlighter-rouge"><div class="highlight"><pre class="highlight"><code>  /**
   * @brief Take care of top bids price and bottom asks price.
   * 
   */
  Price bidsStart{MIN_PRICE_VALUE}, asksStart{MAX_PRICE_VALUE};
</code></pre></div></div>

<p>About the interface that the order book has to provide. At first, I thought of just two functions:</p>

<p>1) <strong>apply the order</strong>.</p>

<p>2) <strong>print out the whole order book</strong>.</p>

<p>During the process of implementing these functions, I added two more: getting <strong>the total number of present orders</strong> and getting <strong>the orders at a specific price</strong>. I don’t think they are going to be used in the project as I see it, but nonetheless, I added them for testing and possible future extensions.</p>

<p>Here is what <strong>class OrderBook</strong> looks like:</p>
<div class="language-plaintext highlighter-rouge"><div class="highlight"><pre class="highlight"><code>class OrderBook {
 public:
  std::expected&lt;void, OrderBookError&gt; applyOrder(const InputOrder&amp;);

  std::size_t getTotalOrdersCount() const;
  std::expected&lt;std::vector&lt;Order&gt;, OrderBookError&gt; getOrdersAtPrice(
      Price) const;

  void dump(std::ostream&amp; os) const;

 private:
  void addOrderAtPrice(const Order&amp;, Price);

  void executeBid(const Order&amp;, Price);
  void executeAsk(const Order&amp;, Price);

  void advanceAsksBoundary();
  void retreatBidsBoundary();

 private:
  /**
  * @brief Array of prices that holds bids and asks.
  * 
  */
  std::array&lt;std::queue&lt;Order&gt;, MAX_PRICE_VALUE + 1&gt; prices;

  /**
   * @brief Take care of top bids price and bottom asks price.
   * 
   */
  Price bidsStart{MIN_PRICE_VALUE}, asksStart{MAX_PRICE_VALUE};
};
</code></pre></div></div>

<p>I’ll get to the implementations in the next part of this series.</p>]]></content><author><name></name></author><summary type="html"><![CDATA[I had a desire to write a highload project in C++ with some application in high-frequency trading, finance, and related fields. My goal is not exactly to dive into the domain of a problem, but rather to carry out millions of operations per second and make a solid C++ project (with tests, scripts, and benchmarks).]]></summary></entry><entry><title type="html">C++20. Generic vector library. Part 3.</title><link href="https://chetter14.github.io/C++20,-Generic-vector-library,-part-3/" rel="alternate" type="text/html" title="C++20. Generic vector library. Part 3." /><published>2026-04-02T00:00:00+00:00</published><updated>2026-04-02T00:00:00+00:00</updated><id>https://chetter14.github.io/C++20,%20Generic%20vector%20library,%20part%203</id><content type="html" xml:base="https://chetter14.github.io/C++20,-Generic-vector-library,-part-3/"><![CDATA[<p>I decided to update the project slightly by improving its <em>code quality</em> and adding <em>CMake</em> and <em>GTest</em>. Once those updates are complete, I’ll consider this learning project finished.</p>

<p>I won’t dive into every change I made to the code. Instead, I’ll just highlight a few updates that I think <em>are worth mentioning</em></p>

<p>1) <code class="language-plaintext highlighter-rouge">noexcept</code> <strong>specifiers</strong>. Several methods in the <em>Vector</em> class are marked with a conditional <code class="language-plaintext highlighter-rouge">noexcept</code> specifier. This specifier evaluates a <code class="language-plaintext highlighter-rouge">noexcept</code> expression to determine whether the function should be treated as <code class="language-plaintext highlighter-rouge">noexcept</code>. Example:</p>
<div class="language-plaintext highlighter-rouge"><div class="highlight"><pre class="highlight"><code>constexpr Vector&amp; operator+=(const Vector&amp; v) noexcept(
    noexcept(std::declval&lt;T&amp;&gt;() += std::declval&lt;T&amp;&gt;())) {
  ...
}
</code></pre></div></div>

<p>This ensures the <code class="language-plaintext highlighter-rouge">noexcept</code> status dynamically evaluates to <code class="language-plaintext highlighter-rouge">true</code> or <code class="language-plaintext highlighter-rouge">false</code> depending on whether the underlying operations on the stored type (<code class="language-plaintext highlighter-rouge">T</code>) are themselves <code class="language-plaintext highlighter-rouge">noexcept</code>.</p>

<p>2) <strong>STL algorithms</strong>. I also replaced all manual <code class="language-plaintext highlighter-rouge">for</code> loops with standard library algorithms. This aligns with the “no raw loops” principle popularized by <em>Sean Parent</em>. I didn’t adopt it just to follow a rule - I genuinely believe this approach leads to cleaner code, making it more <em>readable and modular</em>.</p>

<div class="language-plaintext highlighter-rouge"><div class="highlight"><pre class="highlight"><code>constexpr Vector&amp; operator+=(const Vector&amp; v) noexcept(
    noexcept(std::declval&lt;T&amp;&gt;() += std::declval&lt;T&amp;&gt;())) {
  std::ranges::transform(m_arr, v, m_arr.begin(),
                          [](const auto&amp; a, const auto&amp; b) { return a + b; });
  return *this;
}
...
constexpr Vector operator-() const {
  Vector res = *this;
  std::for_each(res.begin(), res.end(), [](auto&amp; val) { val = -val; });
  return res;
}
</code></pre></div></div>

<p>3) <strong>Printing the <code class="language-plaintext highlighter-rouge">Vector</code> object</strong>. I removed the <code class="language-plaintext highlighter-rouge">friend</code>-qualified <code class="language-plaintext highlighter-rouge">operator&lt;&lt;</code> from the <code class="language-plaintext highlighter-rouge">Vector</code> class. Instead, I added a <code class="language-plaintext highlighter-rouge">dump</code> method and defined a global <code class="language-plaintext highlighter-rouge">operator&lt;&lt;</code> for <code class="language-plaintext highlighter-rouge">Vector</code> that simply calls it:</p>
<div class="language-plaintext highlighter-rouge"><div class="highlight"><pre class="highlight"><code>class Vector {
  ...
  void dump(std::ostream&amp; os) const {
   std::for_each(m_arr.begin(), m_arr.end(),
                 [&amp;](auto val) { os &lt;&lt; val &lt;&lt; " "; });
 }
 ...
};

export template &lt;std::size_t N, VectorElementType T&gt;
std::ostream&amp; operator&lt;&lt;(std::ostream&amp; os, const Vector&lt;N, T&gt;&amp; v) {
  v.dump(os);
  return os;
}
</code></pre></div></div>
<p>This approach ensures that arbitrary <code class="language-plaintext highlighter-rouge">friend</code> functions cannot directly access or manipulate the class’s internal state. Instead, output functionality is strictly confined to a dedicated, controlled method.</p>

<p><strong>CMake</strong>. I created a <code class="language-plaintext highlighter-rouge">CMakePresets.json</code> file with a configuration tailored for Visual Studio 2022. This was primarily for my own workflow, as I developed the project using that IDE.</p>

<p><strong>GTest</strong>. I implemented a basic test suite (<code class="language-plaintext highlighter-rouge">static_assert</code> checks and a few initialization cases) to verify that GTest integrates properly and that tests run smoothly via <em>CTest</em>. In a real-world scenario, I would write comprehensive tests covering all <code class="language-plaintext highlighter-rouge">Vector</code> logic.</p>

<p>With that, I consider the project complete. I achieved my learning goals and don’t see a need to extend it further. While there’s certainly room for improvement and new features, this was always intended as a sandbox rather than a production-ready library. I already have ideas for more complex and interesting projects, and I’ll be sure to share updates once I start building them.</p>]]></content><author><name></name></author><summary type="html"><![CDATA[I decided to update the project slightly by improving its code quality and adding CMake and GTest. Once those updates are complete, I’ll consider this learning project finished.]]></summary></entry><entry><title type="html">C++20. Generic vector library. Part 2.</title><link href="https://chetter14.github.io/C++20,-Generic-vector-library,-part-2/" rel="alternate" type="text/html" title="C++20. Generic vector library. Part 2." /><published>2025-11-25T00:00:00+00:00</published><updated>2025-11-25T00:00:00+00:00</updated><id>https://chetter14.github.io/C++20,%20Generic%20vector%20library,%20part%202</id><content type="html" xml:base="https://chetter14.github.io/C++20,-Generic-vector-library,-part-2/"><![CDATA[<p>Now we come to an interesting topic: <strong>concepts</strong>. I’m going to delve into all the concepts I have defined and describe what each one does and why it is needed.</p>

<p>First, our vector can only be of size 1, 2, or 3—no less than 1, and no more than 3. This is enforced by the following concept:</p>

<div class="language-plaintext highlighter-rouge"><div class="highlight"><pre class="highlight"><code>export template &lt;std::size_t N&gt;
concept CorrectVectorSize = (N &gt;= 1 &amp;&amp; N &lt;= 3);
</code></pre></div></div>

<blockquote>
  <p><strong>Explanation</strong>: The <code class="language-plaintext highlighter-rouge">export</code> keyword before <code class="language-plaintext highlighter-rouge">template</code> means that the concept is exported and can be used in other modules that import this one.</p>
</blockquote>

<p>Second, vector values are inverted in the <code class="language-plaintext highlighter-rouge">invert()</code> function, so we must ensure that the value type supports this operation:</p>
<div class="language-plaintext highlighter-rouge"><div class="highlight"><pre class="highlight"><code>export template &lt;typename T&gt;
concept Invertable = requires(T x) {
  -x;
};
</code></pre></div></div>

<p>I have overloaded the operators <code class="language-plaintext highlighter-rouge">+=</code>, <code class="language-plaintext highlighter-rouge">+</code>, <code class="language-plaintext highlighter-rouge">-=</code>, and <code class="language-plaintext highlighter-rouge">-</code>. Since they operate on vector values, I defined a concept for them:</p>
<div class="language-plaintext highlighter-rouge"><div class="highlight"><pre class="highlight"><code>export template &lt;typename T, typename U&gt;
concept Arithmetic = requires(T x, U y) {
  x + y;
  x - y;
  x += y;
  x -= y;
};
</code></pre></div></div>

<p>To print out vector values:</p>
<div class="language-plaintext highlighter-rouge"><div class="highlight"><pre class="highlight"><code>export template &lt;typename T&gt;
concept Streamable = requires(T x, std::ostream&amp; os) {
  os &lt;&lt; x;
};
</code></pre></div></div>

<p>And also to compare vector values with each other and to move them:</p>
<div class="language-plaintext highlighter-rouge"><div class="highlight"><pre class="highlight"><code>export template &lt;typename T&gt;
concept Comparable = requires(T x, T y) {
  x == y;
  x != y;
  x &gt; y;
  x &gt;= y;
  x &lt; y;
  x &lt;= y;
};

export template &lt;typename T&gt;
concept Movable = requires(T x, T y) {
  x = std::move(y);
  T{std::move(x)};
};
</code></pre></div></div>

<p>Ultimately, the vector’s element type must satisfy all of the specifications above. This is combined into a single concept:</p>
<div class="language-plaintext highlighter-rouge"><div class="highlight"><pre class="highlight"><code>export template &lt;typename T&gt;
concept VectorElementType =
    std::regular&lt;T&gt; &amp;&amp; Invertable&lt;T&gt; &amp;&amp; Arithmetic&lt;T, T&gt; &amp;&amp; Streamable&lt;T&gt; &amp;&amp;
    Comparable&lt;T&gt; &amp;&amp; Movable&lt;T&gt;;
</code></pre></div></div>

<blockquote>
  <p><strong>Explanation</strong>: <code class="language-plaintext highlighter-rouge">std::regular</code> is a type trait that checks if a type has a default constructor, copy constructor, and copy assignment operator.</p>
</blockquote>

<p>Now, in the <code class="language-plaintext highlighter-rouge">Vector</code> class definition, we use these concepts as constraints:</p>
<div class="language-plaintext highlighter-rouge"><div class="highlight"><pre class="highlight"><code>export template &lt;std::size_t N, VectorElementType T&gt;
requires CorrectVectorSize&lt;N&gt; class Vector {
  // ...
};
</code></pre></div></div>

<p>I decided to make the scaling operation in my <code class="language-plaintext highlighter-rouge">Vector</code> class only possible with integer or floating-point numbers. This is enforced by a simple concept:</p>
<div class="language-plaintext highlighter-rouge"><div class="highlight"><pre class="highlight"><code>export template &lt;typename T&gt;
concept RealType = std::integral&lt;T&gt; || std::floating_point&lt;T&gt;;
</code></pre></div></div>

<p>Later, I defined a more specific concept, <code class="language-plaintext highlighter-rouge">ScalableWith</code>, and used it in conjunction with <code class="language-plaintext highlighter-rouge">RealType</code> to constrain <code class="language-plaintext highlighter-rouge">operator*=</code>:</p>
<div class="language-plaintext highlighter-rouge"><div class="highlight"><pre class="highlight"><code>export template &lt;typename T, typename U&gt;
concept ScalableWith = requires(T elem, U scalar) {
  elem *= scalar;
};

...

class Vector { 
  ... 
  constexpr Vector&amp; operator*=(RealType auto scalar) noexcept requires
      ScalableWith&lt;T, decltype(scalar)&gt; {
    for (auto&amp; val : m_arr) {
      val *= scalar;
    }
    return *this;
  }
  ... 
};
</code></pre></div></div>

<p>For the operators <code class="language-plaintext highlighter-rouge">+</code>, <code class="language-plaintext highlighter-rouge">-</code>, <code class="language-plaintext highlighter-rouge">+=</code>, and <code class="language-plaintext highlighter-rouge">-=</code>, I used the <code class="language-plaintext highlighter-rouge">Arithmetic</code> concept to ensure that the values of both <code class="language-plaintext highlighter-rouge">Vector</code>s can be added or subtracted. I also implemented these operators efficiently by defining <code class="language-plaintext highlighter-rouge">operator+</code> in terms of <code class="language-plaintext highlighter-rouge">operator+=</code>:</p>
<div class="language-plaintext highlighter-rouge"><div class="highlight"><pre class="highlight"><code>  template &lt;typename U&gt;
  constexpr Vector&amp; operator+=(const Vector&lt;N, U&gt;&amp; v) noexcept requires
      Arithmetic&lt;T, U&gt; {
    for (int i = 0; i &lt; N; ++i) {
      m_arr[i] += v[i];
    }
    return *this;
  }

  template &lt;typename U&gt;
  friend constexpr Vector operator+(const Vector&amp; lhs,
                                    const Vector&lt;N, U&gt;&amp; rhs) noexcept requires
      Arithmetic&lt;T, U&gt; {
    Vector res = lhs;
    res += rhs;
    return res;
  }
  // The same pattern is used for operator- and operator-=
</code></pre></div></div>

<p>In the <code class="language-plaintext highlighter-rouge">main.cpp</code> file, I added a series of static assertions to verify that the concepts work as intended:</p>
<div class="language-plaintext highlighter-rouge"><div class="highlight"><pre class="highlight"><code>static_assert(RealType&lt;float&gt;);
static_assert(RealType&lt;int&gt;);
static_assert(RealType&lt;double&gt;);
static_assert(!RealType&lt;std::string&gt;);
static_assert(!RealType&lt;std::tuple&lt;double, int&gt;&gt;);
// Other static_assert's with concepts
</code></pre></div></div>

<p>Additionally, in <code class="language-plaintext highlighter-rouge">main.cpp</code>, I wrote several logical operations on <code class="language-plaintext highlighter-rouge">Vector</code> objects to demonstrate their functionality and usage.</p>

<p>I believe I have successfully implemented everything I set out to do, focusing on <strong>concepts and template constraints</strong>. I also successfully integrated <strong>C++20 modules</strong>, which is a great achievement.</p>

<p>There is certainly room for improvement and further modifications - such as adding a <code class="language-plaintext highlighter-rouge">Matrix</code> class composed of <code class="language-plaintext highlighter-rouge">Vector</code> objects or extending the set of operations on <code class="language-plaintext highlighter-rouge">Vector</code>. However, for now, I consider this project complete.</p>]]></content><author><name></name></author><summary type="html"><![CDATA[Now we come to an interesting topic: concepts. I’m going to delve into all the concepts I have defined and describe what each one does and why it is needed.]]></summary></entry><entry><title type="html">C++20. Generic vector library. Part 1.</title><link href="https://chetter14.github.io/C++20,-Generic-vector-library,-part-1/" rel="alternate" type="text/html" title="C++20. Generic vector library. Part 1." /><published>2025-11-12T00:00:00+00:00</published><updated>2025-11-12T00:00:00+00:00</updated><id>https://chetter14.github.io/C++20,%20Generic%20vector%20library,%20part%201</id><content type="html" xml:base="https://chetter14.github.io/C++20,-Generic-vector-library,-part-1/"><![CDATA[<p>Recently, I finally decided to get my hands on <em>C++20</em>. I began reading <em>A Tour of C++</em> (3rd edition) by Bjarne Stroustrup. After reading more than half of it, I can say that it’s pretty good — you can definitely find some cool new things for yourself.</p>

<p>But reading alone isn’t enough, so I decided to complete a project to apply the knowledge and skills I’ve learned in real-world, concrete cases.</p>

<p>The first such project is a <strong>generic vector library</strong>. It’s a header-only library that defines <strong>operations on mathematical vectors such as</strong> addition, subtraction, multiplication, calculating magnitude, accessing elements, and more. This list isn’t final and may be extended later (I might want to add more functionality).</p>

<p>The project is available <a href="https://github.com/chetter14/generic-vector-library">here</a>.</p>

<p>The main idea of this project is to <em>deal with concepts, type functions, and metaprogramming</em> in general. So the implementation of the library is not the core, but the interface is.</p>

<p>Before diving into the library itself, I should say that I use modules in this project as they were added in C++20. And at the moment library is <em>placed in .cppm file</em>. Later I’ll add a version of it in a header.</p>

<p>The main idea of this project is to <strong>experiment with concepts, type functions, and metaprogramming</strong> in general. So, the core of the project isn’t the implementation itself, but rather the interface design.</p>

<p>Before diving into the library itself, I should mention that I’m using <strong>modules</strong> in this project, as they were introduced in C++20. At the moment, the library is <strong>contained in a</strong> <code class="language-plaintext highlighter-rouge">.cppm</code> <strong>file</strong>. Later, I’ll also provide a header-based version.</p>

<p>At first, I wrote a <em>Makefile</em> to build both the library and a sample program that uses it.
Currently, the C++ compiler version and compilation flags are as follows:</p>
<div class="language-plaintext highlighter-rouge"><div class="highlight"><pre class="highlight"><code>CXX = /opt/homebrew/opt/llvm/bin/clang++
CXXFLAGS = -std=c++20 -stdlib=libc++
</code></pre></div></div>
<p>The C++ compiler path is hardcoded for my local development setup for now — I’ll fix this later.</p>

<p>One more interesting part of the <em>Makefile</em> is the additional compilation options:</p>

<p>1) <code class="language-plaintext highlighter-rouge">-fmodule-output=Vector.pcm</code> - used when building the <code class="language-plaintext highlighter-rouge">.cppm</code> file (similar to a traditional header) to specify the name of the <strong>Compiled Module Interface (CMI)</strong>, which will then be used when building <code class="language-plaintext highlighter-rouge">.cpp</code> files such as the sample.</p>

<p>2) <code class="language-plaintext highlighter-rouge">-fprebuilt-module-path=.</code> - specifies the location of the CMI, allowing the sample (or any other file) to <em>import</em> the module and use its functionality.</p>

<p>In short, it means:</p>
<blockquote>
  <p>“You have a <code class="language-plaintext highlighter-rouge">Vector.cppm</code> file — compile it to produce a <code class="language-plaintext highlighter-rouge">Vector.pcm</code> file. Then, use <code class="language-plaintext highlighter-rouge">Vector.pcm</code> when compiling <code class="language-plaintext highlighter-rouge">main.cpp</code>.”</p>
</blockquote>

<p>An important note: <em>currently</em>, there are no concepts, template constraints, or similar features yet. I first wanted to build a basic <code class="language-plaintext highlighter-rouge">Vector</code> class with simple logic, and only after that add template parameters and apply metaprogramming principles.</p>

<p>Now, onto the <code class="language-plaintext highlighter-rouge">Vector</code> <strong>class module</strong>.
At the top, I declare a <em>global module fragment</em> to include the standard C++ headers used inside my exported module. After that, the <code class="language-plaintext highlighter-rouge">Vector</code> class itself is defined:</p>

<div class="language-plaintext highlighter-rouge"><div class="highlight"><pre class="highlight"><code>module;
#include &lt;array&gt;
#include &lt;algorithm&gt;
#include &lt;iostream&gt;
#include &lt;cmath&gt;
#include &lt;ranges&gt;
#include &lt;type_traits&gt;

export module Vector;

export template&lt;int N, typename T&gt;
class Vector
{
    ...
};
</code></pre></div></div>

<p>I’ve defined an <strong>initializer-list constructor</strong> for <code class="language-plaintext highlighter-rouge">Vector</code> objects.
The copy/move constructors, destructor, and assignment operators are all defaulted since the <code class="language-plaintext highlighter-rouge">std::array</code> member doesn’t require any special handling.</p>
<div class="language-plaintext highlighter-rouge"><div class="highlight"><pre class="highlight"><code>Vector(std::initializer_list&lt;T&gt; lst) 
{
    std::ranges::copy(lst, m_arr.begin());
}
// ... default constructors, destructor, and assignments
</code></pre></div></div>

<p>I’ve also provided <code class="language-plaintext highlighter-rouge">begin()</code> and <code class="language-plaintext highlighter-rouge">end()</code> functions so that range-based for loops can be used with the <code class="language-plaintext highlighter-rouge">Vector</code> object:</p>
<div class="language-plaintext highlighter-rouge"><div class="highlight"><pre class="highlight"><code>// for modification:
auto begin() noexcept { return m_arr.begin(); }
auto end() noexcept { return m_arr.end(); }

// for read-only access:
auto begin() const noexcept { return m_arr.begin(); }
auto end() const noexcept { return m_arr.end(); }
</code></pre></div></div>

<p>Next, I declared <strong>operator overloading</strong> functions and implemented the <strong>magnitude calculation</strong>. Their definitions are straightforward and not particularly interesting to dive into here.</p>

<p>I also defined other operations for the <code class="language-plaintext highlighter-rouge">Vector</code> class — such as <strong>addition</strong>, <strong>subtraction</strong>, <strong>inversion</strong>, and <strong>printing</strong> the vector contents.</p>

<p>The <code class="language-plaintext highlighter-rouge">main.cpp</code> file contains simple test logic to verify that various operations on <code class="language-plaintext highlighter-rouge">Vector</code> objects work correctly and that no errors occur during <strong>compilation</strong>, <strong>linking</strong>, or <strong>runtime</strong>.</p>

<p>That’s it for the initial implementation of the <code class="language-plaintext highlighter-rouge">Vector</code> class.</p>

<p>The next step is to integrate <strong>concepts</strong>, <strong>requires-clauses</strong>, and other <strong>metaprogramming techniques</strong> into the class to make it more generic and expressive.</p>]]></content><author><name></name></author><summary type="html"><![CDATA[Recently, I finally decided to get my hands on C++20. I began reading A Tour of C++ (3rd edition) by Bjarne Stroustrup. After reading more than half of it, I can say that it’s pretty good — you can definitely find some cool new things for yourself.]]></summary></entry><entry><title type="html">DevOps. How I set up CI/CD.</title><link href="https://chetter14.github.io/DevOps,-how-I-set-up-CI-and-CD/" rel="alternate" type="text/html" title="DevOps. How I set up CI/CD." /><published>2025-09-20T00:00:00+00:00</published><updated>2025-09-20T00:00:00+00:00</updated><id>https://chetter14.github.io/DevOps,%20how%20I%20set%20up%20CI%20and%20CD</id><content type="html" xml:base="https://chetter14.github.io/DevOps,-how-I-set-up-CI-and-CD/"><![CDATA[<p>Yeah, I’m back after a long break from posting anything here. I got a new job that required my full attention, and I was also dealing with university tasks and labs. But now I’m kinda free from university and have time to share my experience from the projects I was working on.</p>

<p>I want to talk about how I set up CI/CD for a uni project. The goal was to write a web application and integrate CI/CD into it. My teammate built the backend (Java) and frontend (TypeScript) - so, all the coding-related stuff. My job was to write the CI/CD pipeline for the app. The project sources can be found <a href="https://github.com/chetter14/devops">here</a>.</p>

<p>I built the CI/CD pipeline using GitHub Actions. Here are the steps I took, in order:</p>

<p>1) <strong>Add <code class="language-plaintext highlighter-rouge">build</code> and <code class="language-plaintext highlighter-rouge">test</code> jobs</strong>. First, you build the backend and frontend, and then run unit tests to see if anything fails. I didn’t encounter any major difficulties here.</p>

<p>2) <strong>Deploy the app to Kubernetes</strong>. This was tough because I hadn’t worked with Kubernetes before, so I used <strong>Kompose</strong> to convert <code class="language-plaintext highlighter-rouge">docker-compose.yml</code> into deployment and service configs. All the K8s configs are located <a href="https://github.com/chetter14/devops/tree/main/kubernetes/configs">here</a>. I’m not sure about the number of files; maybe it could have been done with fewer.</p>

<p>We chose to deploy the application on <em>Yandex Cloud</em> because it offers free access until you hit certain CPU/resource limits. This was fine for our needs, as the project was meant to be educational and wouldn’t handle serious load.</p>

<p>After playing with Kubernetes commands like <code class="language-plaintext highlighter-rouge">kubectl apply -f</code> and <code class="language-plaintext highlighter-rouge">kubectl top pods</code>, I got the general idea and was able to deploy the application successfully.</p>

<p>3) <strong>Add horizontal scaling for the backend based on load</strong>. This was straightforward. You just add a separate config — <code class="language-plaintext highlighter-rouge">backend-hpa.yaml</code> — where you describe which service to scale, how quickly, under what conditions, etc.</p>

<p>4) <strong>Connect Grafana to display application metrics</strong>: <em>RAM usage, request counts, average CPU load</em>, etc. This data is collected from each pod. I think the <a href="https://github.com/chetter14/devops/blob/main/kubernetes/configs/grafana-dashboard.yaml">dashboard</a> we used (which I got from my teammate) is pretty good, so you can use it in your own apps.</p>

<p>I also added a step to push Docker images for the backend and frontend to Docker Hub, so they <em>could be pulled from there during deployment</em>.</p>

<p>5) <strong>Add code analysis with SonarQube</strong> to find <strong>security errors, code hotspots, and check code coverage</strong>. If coverage is less than <em>80 percent</em> or critical issues are found, the pipeline fails. This uses the default SonarQube Quality Gate, which can’t be adjusted without upgrading your plan.</p>

<p>The SonarQube analysis process is also integrated into the CI pipeline.</p>

<p>6) <strong>The final step was to implement continuous deployment (CD)</strong> by adding an automatic deployment job in GitHub Actions. I created a set of <em>GitHub Secrets</em> that the pipeline uses to connect to the remote host (provided by Yandex Cloud), copy the config files, and deploy everything successfully.</p>

<p>You might notice <em>Telegram bot</em> related variables. Integrating a Telegram bot for sending application logs was part of the task requirements. It wasn’t particularly captivating for me, and it doesn’t really fit the CI/CD topic.</p>

<p>So, that’s how I set up CI/CD for the project. It was sometimes interesting, sometimes annoying. Now I understand better why DevOps is a separate role in companies. It demands a lot of attention and requires more than just beginner-level expertise.</p>]]></content><author><name></name></author><summary type="html"><![CDATA[Yeah, I’m back after a long break from posting anything here. I got a new job that required my full attention, and I was also dealing with university tasks and labs. But now I’m kinda free from university and have time to share my experience from the projects I was working on.]]></summary></entry><entry><title type="html">Develop My Programming Language. Part 1.</title><link href="https://chetter14.github.io/Develop-My-Programming-Language/" rel="alternate" type="text/html" title="Develop My Programming Language. Part 1." /><published>2025-02-04T00:00:00+00:00</published><updated>2025-02-04T00:00:00+00:00</updated><id>https://chetter14.github.io/Develop%20My%20Programming%20Language</id><content type="html" xml:base="https://chetter14.github.io/Develop-My-Programming-Language/"><![CDATA[<p>Here I am, after a few months of silence. Now I want to share my experience of making <em>some sort of</em> a <strong>compiler</strong>. The task is part of my studying at Master’s.</p>

<p>So, basically I should write a program in <em>C</em>. The program takes an <em>input of one or more files that contain a code in my language</em> (well, the syntax it should follow is given by a teacher) and produce <em>an output - an executable file</em>.</p>

<p>The first thing to do is to build an <strong>Abstract Syntax Tree (AST)</strong>. For this purpose I use <a href="https://www.antlr3.org/">ANTLR3</a>. It’s such a tool that allows you to write <em>syntax rules for your language</em>. I’ve written simple rules regarding: function signatures and calls, parameters, various expressions, types, and etc. All of it you can see <a href="https://github.com/chetter14/my-language/blob/master/common/MyLanguage.g">here</a>.</p>

<p>Using <code class="language-plaintext highlighter-rouge">antlr-3.5.3-complete.jar</code> on <code class="language-plaintext highlighter-rouge">MyLanguage.g</code> file I get lexer and parser sources and headers that are going to be utilized in my program sources.</p>

<p>Then <code class="language-plaintext highlighter-rouge">antlr-runtime-c</code> <a href="https://github.com/antlr/antlr3/tree/master/runtime/C">library</a> was required for successful build. I’ve taken it by copy-pasting for the lack of time and experience of working with the third-party open-source libraries. Not sure whether it matters or not, I have no experience with software licenses as well.</p>

<p>So, to my code. I wrote a simple <code class="language-plaintext highlighter-rouge">main()</code> function that reads an input file and produces an AST structure. To present the result AST the <a href="https://graphviz.org/">Graphviz</a> library is used. And thanks to <code class="language-plaintext highlighter-rouge">antlr-runtime-c</code> lib there is a function <code class="language-plaintext highlighter-rouge">makeDot()</code> that produces a file of <code class="language-plaintext highlighter-rouge">DOT</code> format that is readable by <strong>Graphviz</strong> library:</p>
<div class="language-plaintext highlighter-rouge"><div class="highlight"><pre class="highlight"><code>pANTLR3_STRING dotString = parser-&gt;adaptor-&gt;makeDot(parser-&gt;adaptor, tree);

fprintf(dotFile, "%s", (char*)dotString-&gt;chars);
fclose(dotFile);
</code></pre></div></div>

<p>There is a <code class="language-plaintext highlighter-rouge">.dot</code> file shows up after execution of the program. By the command <code class="language-plaintext highlighter-rouge">dot -Tpng output.dot -o output.png</code> it is being converted into <code class="language-plaintext highlighter-rouge">.png</code> format so that you can easily see the AST.</p>

<p>Also I made some modifications to the AST that is taken from <em>ANTLR</em> library functions, namely rotation of function calls and array accesses. <code class="language-plaintext highlighter-rouge">ANTLRv3</code> (the 3rd version) does not allow left-recursive expressions, that’s why there is <em>suffixes</em> in syntax rules and not <em>prefixes</em>. This is requirement from teacher that function calls and array accesses should be left-recursive, and I did it.</p>]]></content><author><name></name></author><summary type="html"><![CDATA[Here I am, after a few months of silence. Now I want to share my experience of making some sort of a compiler. The task is part of my studying at Master’s.]]></summary></entry><entry><title type="html">Algorithms and Data Structures. Sqrt Decomposition.</title><link href="https://chetter14.github.io/Algorithms-and-Data-Structures,-Sqrt-Decomposition/" rel="alternate" type="text/html" title="Algorithms and Data Structures. Sqrt Decomposition." /><published>2024-10-21T00:00:00+00:00</published><updated>2024-10-21T00:00:00+00:00</updated><id>https://chetter14.github.io/Algorithms%20and%20Data%20Structures,%20Sqrt%20Decomposition</id><content type="html" xml:base="https://chetter14.github.io/Algorithms-and-Data-Structures,-Sqrt-Decomposition/"><![CDATA[<p>So, in my Master’s program, I took a course <em>“Advanced Algorithms and Data Structures”</em>. At first, you should set up an environment on your local machine the way it is set up in their <a href="https://contest.yandex.com/">Yandex Contest</a> environment. The template project they provided for such a task can be found <a href="https://github.com/vityaman-edu/algocont">here</a>. I forked from their repository and had to deal with a few problems to make the environment work on my machine. Namely, I changed: <em>EOL symbols</em> (because I am on Windows but the code is compiled and run on Linux), <em>scripts</em> a bit (used ‘bash’ instead of ‘sh’), and other little things.</p>

<p>After getting the environment ready I got to the task - <em>“Implement an efficient data structure that allows you to modify array elements and compute the index of the k-th zero from the left in a given segment of the array”</em>. So, the input is <em>the array you work with and the queries (update, get) you handle on this array</em>. The general solution to this problem can be achieved by <strong>sqrt-decomposition</strong>. I am going to show the crucial parts of my solution, all the code base is resided <a href="https://github.com/chetter14/algocont/tree/labs">here</a>.</p>

<p>To start, we have to calculate our block length and the amount of blocks that we are going to split our array into. The <em>block length is a square root of an array size</em> rounded to an integer. But I <em>round</em> the block length value to <em>the value of the power of two</em>. The point is the following: the <code class="language-plaintext highlighter-rouge">block_len</code> value is used frequently in calculations (namely, divisions) and if the <code class="language-plaintext highlighter-rouge">block_len</code> value is, say, \(333\) (for a large input array), then calculations <em>would be slow</em> and optimal performance won’t be achieved. But with a value like \(256\) divisions <em>go faster</em> (because it’s shift right operation).</p>
<div class="language-plaintext highlighter-rouge"><div class="highlight"><pre class="highlight"><code>uint block_len = GetClosestPowerTwo(static_cast&lt;int&gt;(std::sqrt(size)));
uint blocks_amount = (size + block_len - 1) / block_len;
</code></pre></div></div>

<p>I want <code class="language-plaintext highlighter-rouge">Update()</code> operation to be \(O(1)\) and I made it this way:</p>
<div class="language-plaintext highlighter-rouge"><div class="highlight"><pre class="highlight"><code>void Update(int index, int value) {
	if (arr_[index] == value) {  // Nothing changes
	  return;
	}

	// Update the block:
	int&amp; bck_zero_count = blocks_[index / block_len_];
	if (arr_[index] == 0 &amp;&amp; value != 0) {
	  --bck_zero_count;
	} else if (arr_[index] != 0 &amp;&amp; value == 0) {
	  ++bck_zero_count;
	}

	// Update the array:
	arr_[index] = value;
	}
</code></pre></div></div>

<p>The <code class="language-plaintext highlighter-rouge">Get()</code> operation is \(O(sqrt(n))\) now. In few words, the algorithm is to process the leftmost partial block element by element, jump over full blocks in between (handling them somehow), and process the rightmost partial block:</p>
<div class="language-plaintext highlighter-rouge"><div class="highlight"><pre class="highlight"><code>int Get(uint left, uint right, uint key) {
    uint zero_count = 0;

    // Process the leftmost partial block
    while (left &lt;= right &amp;&amp; (left % block_len_ != 0) &amp;&amp; left != 0) {
      if (arr_[left] == 0 &amp;&amp; ++zero_count == key) {
        return static_cast&lt;int&gt;(left) + 1;
      }
      ++left;
    }

    // Process full blocks in the middle
    uint cur_block = left / block_len_;
    while (left + block_len_ - 1 &lt;= right &amp;&amp; zero_count + blocks_[cur_block] &lt; key) {
      zero_count += blocks_[cur_block];
      left += block_len_;
      cur_block = left / block_len_;
    }

    // Process the rightmost partial block
    while (left &lt;= right) {
      if (arr_[left] == 0 &amp;&amp; ++zero_count == key) {
        return static_cast&lt;int&gt;(left) + 1;
      }
      ++left;
    }

    return -1;
  }
</code></pre></div></div>

<p>With such a code I could fit into time and memory limits. Other captivating things I encountered are <em><code class="language-plaintext highlighter-rouge">.clang-tidy</code> and <code class="language-plaintext highlighter-rouge">.clang-format</code></em>. These files describe the style you must write your code in. In the beginning, I was stunned, mainly because of anger. But now I understand that it’s <em>a strong tool</em> that should be applied in companies and universities. I think, it leads to <em>better maintenance</em> of the whole codebase and <strong>acts as rules, laws, and protocols</strong> in other engineering fields. It provides a <em>foundation</em> from which you can work in a sense of purely engineering field.</p>]]></content><author><name></name></author><summary type="html"><![CDATA[So, in my Master’s program, I took a course “Advanced Algorithms and Data Structures”. At first, you should set up an environment on your local machine the way it is set up in their Yandex Contest environment. The template project they provided for such a task can be found here. I forked from their repository and had to deal with a few problems to make the environment work on my machine. Namely, I changed: EOL symbols (because I am on Windows but the code is compiled and run on Linux), scripts a bit (used ‘bash’ instead of ‘sh’), and other little things.]]></summary></entry><entry><title type="html">Computer Networking. Network Layer. Control Plane.</title><link href="https://chetter14.github.io/Computer-Networking,-Network-Layer,-Control-Plane/" rel="alternate" type="text/html" title="Computer Networking. Network Layer. Control Plane." /><published>2024-09-25T00:00:00+00:00</published><updated>2024-09-25T00:00:00+00:00</updated><id>https://chetter14.github.io/Computer%20Networking,%20Network%20Layer,%20Control%20Plane</id><content type="html" xml:base="https://chetter14.github.io/Computer-Networking,-Network-Layer,-Control-Plane/"><![CDATA[<p>I have dealt with few tasks related to the topic of Network Layer (on OSI) here: <em>ICMP ping</em> and routing via the <em>distance-vector algorithm</em>. At first, about the ICMP ping program. My task is to write a piece of code that processes the received message from ‘ping’ command - prints out the delay time or that the request is timed out. I am talking about this part:</p>

<div class="language-plaintext highlighter-rouge"><div class="highlight"><pre class="highlight"><code>...
echo_reply = struct.unpack("qqibbHHhff", recPacket)			# the received packet is in binary format
# print(echo_reply)

icmp_header_index = 3                                    # at the 3rd index of received message starts ICMP type and code 
if isErrorInEcho(echo_reply[icmp_header_index], echo_reply[icmp_header_index + 1]):
	return "Error occurred."

# in binary format we read from recPacket into 2 floats but we need 1 double, so we convert it from one type to another
double_struct = struct.pack("ff", echo_reply[icmp_header_index + 5], echo_reply[icmp_header_index + 6])
time_in_packet = struct.unpack("d", double_struct)[0]

delta = timeReceived - time_in_packet

timeLeft = timeLeft - howLongInSelect
if timeLeft &lt;= 0:
	return "Request timed out."
else:
	return delta
...
</code></pre></div></div>

<p>Also, I added: 1) an extra function to handle ICMP erros, and 2) printing out of min, max, average RTT (Round Trip Time) and the percentage of packet loss:</p>
<div class="language-plaintext highlighter-rouge"><div class="highlight"><pre class="highlight"><code>...
def isErrorInEcho(type, code):
    if type == 3:                       # means ICMP error
        if code == 0:
            print("Destination network unreachable")
        elif code == 1:
            print("Destination host unreachable")
        elif code == 2:
            print("Destination protocol unreachable")
        elif code == 3:
            print("Destination port unreachable")
        elif code == 6:
            print("Destination network unknown")
        elif code == 7:
            print("Destination host unknown")
        return True
    return False

...

pings_number = 10

min_rtt = 10
max_rtt = 0
total_rtt_sum = 0
rtt_number = 0
packets_lost = 0

# Send ping requests to a server separated by approximately one second
for i in range(pings_number) :
	delay = doOnePing(dest, timeout)
	print("RTT - " + str(delay) + "s")

	if isinstance(delay, str):
		packets_lost = packets_lost + 1
	else:
		if delay &lt; min_rtt:
			min_rtt = delay
		elif delay &gt; max_rtt:
			max_rtt = delay
		total_rtt_sum = total_rtt_sum + delay
		rtt_number = rtt_number + 1

	time.sleep(1)# one second

print("")
print("Max RTT - " + str(max_rtt) + "s")
print("Min RTT - " + str(min_rtt) + "s")
print("Average RTT - " + str(total_rtt_sum / rtt_number) + "s")
print("Packets lost - " + str(packets_lost / pings_number * 100) + "%")

...
</code></pre></div></div>

<p>So, to the “Distributed Asynchronous Distance Vector Routing” application. The whole task description can be found <a href="https://gaia.cs.umass.edu/kurose_ross/programming/DV/Programming%20Assignment%201.html">here</a>. Although I developed 2 functions - <code class="language-plaintext highlighter-rouge">rtinit()</code> and <code class="language-plaintext highlighter-rouge">rtupdate()</code> - for each node in the graph, I will show the code of the 0 node because the logic stays the same despite the node number (except for distance values):</p>
<div class="language-plaintext highlighter-rouge"><div class="highlight"><pre class="highlight"><code>static void notifyNeighboringNodes()
{
	// Send the distance vector to 1, 2, and 3 nodes:
	
	struct rtpkt updatePacket;
	updatePacket.sourceid = 0;
	for (int i = 0; i &lt; 4; ++i)
	{
		updatePacket.mincost[i] = dt0.costs[i][0];
	}
	
	for (int i = 1; i &lt; 4; ++i)
	{
		updatePacket.destid = i;
		tolayer2(updatePacket);
	}
}

void rtinit0() 
{
	// Initialize a distance vector:
	
	// destination 0:
	dt0.costs[0][0] = 0;
	dt0.costs[0][1] = 999;		// source 0 and dest 0 through 1/2/3 makes no sense, so assign "infinity"
	dt0.costs[0][2] = 999;
	dt0.costs[0][3] = 999;
	
	// destination 1:
	...
	
	// destination 2:
	...
	
	// destination 3:
	...
	
	// printf("Node 0 initialization at %f\n\n", clocktime);
	
	printdt0(&amp;dt0);
	
	notifyNeighboringNodes();	// to spread the info about "this node"s distance values to its neighbors
}

void rtupdate0(rcvdpkt)
  struct rtpkt *rcvdpkt;
{
	int srcNode = rcvdpkt-&gt;sourceid;
	
	// iterate over min costs of another node:
	
	printf("\nBefore update:\n");
	printdt0(&amp;dt0);

	
	bool wasUpdated = false;
	for (int i = 0; i &lt; 4; ++i)
	{
		if (dt0.costs[i][0] &gt; rcvdpkt-&gt;mincost[i] + dt0.costs[srcNode][0])
		{
			dt0.costs[i][0] = rcvdpkt-&gt;mincost[i] + dt0.costs[srcNode][0];
			wasUpdated = true;
		}
	}
	
	// printf("Node 0 update at %f\n\n", clocktime);
		
	if (wasUpdated)
	{
		printf("\nAfter update:\n");
		printdt0(&amp;dt0);
		printf("\nCosts to other nodes: 1 - %d, 2 - %d, 3 - %d\n", dt0.costs[1][0], dt0.costs[2][0], dt0.costs[3][0]);
		notifyNeighboringNodes();
	}
}
</code></pre></div></div>
<p>I should note that <code class="language-plaintext highlighter-rouge">rtinit()</code> and <code class="language-plaintext highlighter-rouge">rtupdate()</code> functions are written separetely for each node number because it’s the way the task asks to do it. In real circumstances, the code should be written once to avoid duplication of code and improve scalability of the project.</p>]]></content><author><name></name></author><summary type="html"><![CDATA[I have dealt with few tasks related to the topic of Network Layer (on OSI) here: ICMP ping and routing via the distance-vector algorithm. At first, about the ICMP ping program. My task is to write a piece of code that processes the received message from ‘ping’ command - prints out the delay time or that the request is timed out. I am talking about this part:]]></summary></entry><entry><title type="html">Computer Networking. Reliable Transport Protocol. Part 2.</title><link href="https://chetter14.github.io/Computer-Networking,-Reliable-Transport-Protocol,-Part-2/" rel="alternate" type="text/html" title="Computer Networking. Reliable Transport Protocol. Part 2." /><published>2024-09-15T00:00:00+00:00</published><updated>2024-09-15T00:00:00+00:00</updated><id>https://chetter14.github.io/Computer%20Networking,%20Reliable%20Transport%20Protocol,%20Part%202</id><content type="html" xml:base="https://chetter14.github.io/Computer-Networking,-Reliable-Transport-Protocol,-Part-2/"><![CDATA[<p>So, after completing an RTP using the <em>Alternating-Bit-Protocol</em>, the next assignment is to complete it via the <strong>GBN</strong> (<em>Go-Back-N</em>) protocol. I won’t delve into the details of GBN but I’ll list a few <em>important properties of this version</em> of the lab:</p>
<ol>
  <li>Packets are sent in the amount of window size (at least, certainly can be sent like that);</li>
  <li>If the window of packets is full, then upcoming packets will be stored in a buffer. Later on, packets from the buffer are going to be fetched and sent to the client.</li>
</ol>

<p>It’s a brief explanation, the full description of the task you can find <a href="https://gaia.cs.umass.edu/kurose_ross/programming/RDT/RDT_Implementing%20a%20Reliable%20Transport%20Protocol.html">here</a>.</p>

<p>I won’t tell about the logic and algorithms of the GBN implementation here because it’s larger than in the ABP approach, but you can read it <a href="https://github.com/chetter14/computer-networking-assignments/tree/main/RTP">here</a>, as well as the source code. Also, I won’t pass through each piece of code because of its complexity and size, and will step through the main parts of it. So, to the code of the A-side:</p>
<div class="language-plaintext highlighter-rouge"><div class="highlight"><pre class="highlight"><code>/* called from layer 5, passed the data to be sent to other side */
A_output(message)
  struct msg message;
{	
	struct pkt packet;
	packet.acknum = -1;						// ack number isn't used in the sender
	strcpy(packet.payload, message.data);
		
	if (A_sender.nextSeqNum &lt; A_sender.base + N)	// there is room for a packet in window
	{
		packet.seqnum = A_sender.nextSeqNum;
		packet.checksum = calculateChecksum(&amp;packet);
		A_sender.packets[A_sender.nextSeqNum] = packet;		// store the packet for possible retransmission
		tolayer3(0, packet);
		
		if (A_sender.nextSeqNum == A_sender.base)
			starttimer(0, timeout);
		A_sender.nextSeqNum++;
	}
	else if (!isBufferFull())						// there is room for a packet in buffer
	{
		addPktToBuffer(packet);
	}
	else 											// no room anywhere
		exit(0);									// ! INTENTIONAL EXIT(), REQUIRED BY THE TASK !
}

...

void sendPacketsFromBuffer()
{
	while (A_sender.nextSeqNum &lt; A_sender.base + N &amp;&amp; !isBufferEmpty())		// until window is full and there are left packets in buffer
	{																			// take packets from buffer and send them
		struct pkt tempPacket = getPktFromBuffer();
		tempPacket.seqnum = A_sender.nextSeqNum;
		tempPacket.checksum = calculateChecksum(&amp;tempPacket);
		A_sender.packets[A_sender.nextSeqNum] = tempPacket;			// for possible retransmission
		tolayer3(0, tempPacket);
		
		A_sender.nextSeqNum++;
	}
}

/* called from layer 3, when a packet arrives for layer 4 */
A_input(packet)
  struct pkt packet;
{
	if (isPacketValid(&amp;packet))
	{
		A_sender.base = packet.acknum + 1;
		if (A_sender.base == A_sender.nextSeqNum)		// window is completely empty
		{
			if (!isBufferEmpty())						// there are packets in buffer
			{
				sendPacketsFromBuffer();
				stoptimer(0);
				starttimer(0, timeout);
			}
			else										// no packets in buffer
				stoptimer(0);
		}
		else											// window is not totally full
		{
			if (!isBufferEmpty())						// there are packets in buffer
			{
				sendPacketsFromBuffer();
			}
			// No timer reset because packets that were sent first are going to be delayed for retransmission even further 
			// so, I am trying to avoid it
			// stoptimer(0);
			// starttimer(0, timeout);
		}
	}
	else
		;// received packet is corrupted - do nothing
}
</code></pre></div></div>

<p>As you can see, the buffer is used there, so I’ve created a buffer header file that contains all the required logic. <em>The buffer is implemented via the circular queue - the FIFO approach on the array of data</em>:</p>
<div class="language-plaintext highlighter-rouge"><div class="highlight"><pre class="highlight"><code>// stores packets to be sent
typedef struct Buffer
{
	struct pkt packets[50];			// size of buffer - 50 packets
	int start;
	int size;
} Buffer;

Buffer buffer; 

void initBuffer()
{
	buffer.start = 0;
	buffer.size = 0;
}

bool isBufferFull()
{
	return buffer.size == 50;
}

bool isBufferEmpty()
{
	return buffer.size == 0;
}

void addPktToBuffer(struct pkt packet)
{
	int newPacketIndex = (buffer.start + buffer.size) % 50;
	buffer.packets[newPacketIndex] = packet;
	buffer.size++;
	printf("addPktToBuffer: %s\n", packet.payload);
}

struct pkt getPktFromBuffer()
{
	struct pkt packet = buffer.packets[buffer.start];
	printf("getPktFromBuffer: %s\n", packet.payload);
	buffer.start = (buffer.start + 1) % 50;
	buffer.size--;
	return packet;
}
</code></pre></div></div>

<p>And to the B side that is light and straighforward:</p>
<div class="language-plaintext highlighter-rouge"><div class="highlight"><pre class="highlight"><code>B_input(packet)
  struct pkt packet;
{
	if (isPacketValid(&amp;packet))
	{
		if (packet.seqnum != B_receiver.expectedSeqNum)
		{
			B_receiver.packet.acknum = B_receiver.expectedSeqNum - 1;	// the last correctly received
		}
		else
		{
			struct msg message;
			strcpy(message.data, packet.payload);
			tolayer5(1, message);
			
			B_receiver.packet.acknum = B_receiver.expectedSeqNum;
			B_receiver.expectedSeqNum++;
		}
	}
	else	// packet is corrupted
	{
		B_receiver.packet.acknum = B_receiver.expectedSeqNum - 1;
	}
	
	B_receiver.packet.checksum = calculateChecksum(&amp;B_receiver.packet);
	tolayer3(1, B_receiver.packet);
}
</code></pre></div></div>]]></content><author><name></name></author><summary type="html"><![CDATA[So, after completing an RTP using the Alternating-Bit-Protocol, the next assignment is to complete it via the GBN (Go-Back-N) protocol. I won’t delve into the details of GBN but I’ll list a few important properties of this version of the lab: Packets are sent in the amount of window size (at least, certainly can be sent like that); If the window of packets is full, then upcoming packets will be stored in a buffer. Later on, packets from the buffer are going to be fetched and sent to the client.]]></summary></entry></feed>